Tag Archives: projects

Project: grippable crayons

Crayola sells egg-shaped crayons for toddlers, which apparently are very easy to grip. Unfortunately, I can’t stomach paying $6.99 for three crayons.

So I made my own. They look funny, but your toddler won’t know that, and they cost nothing (providing you have some old broken crayons). Lily likes them for banging on paper and gnawing.

oval crayons

Heat the oven to 275 F / 135 C.

Take the paper off some old crayons.

Break them up and put them in muffin tins or mini-muffin tins. You can do mixed colors or each one a solid color. You can line the cups with wax paper if you want.

Put it in the oven for 10 minutes or until the wax is melted.

Let cool until you can touch it comfortably but the wax is not fully hard. Roll the wax between your palms to make a rounded shape.

To get the inevitable wax bits off your muffin tin, put it in the freezer for a while and the bits will scrape off easily.

Projects: coat extender for babywearing, and vest

When Lily and I go out in cold weather, it’s a challenge to get the right number of layers for the transitions (warm store to cold street, t0 medium subway station, to crowded warm subway, to cold street, to warm bus, to cold street, to warm house.)

I bought my coat a size big last winter—big enough to zip over a pregnant belly but not over me and a seven-month-old in her carrier.

I saw a design for a commercial coat extender and decided to make my own.

My coat has both snaps and a zipper. I sewed a double layer of fleece to one edge of my coat. I found some extra snaps on the cuff of the coat and cut them out. I sewed them (by the severed fabric) to the other edge of the fleece.

snaps

The original zipper and snaps are all still there, so I can tuck the fleece inside and zip it as normal when I don’t have Lily.

highchair

Lily helping

I can wear her in her carrier as normal:

carrier

The coat goes over both of us. When we go from a cold to a warm place, I can open the snaps to air her out. I tried it out, and I think it keeps her quite warm, but it’s draftier for me because the front of the coat isn’t next to my legs. I also need to figure out a way to keep the front of my neck warm.

coat

With some of the other fleece (from a cut-up blanket), I made a vest for Lily. Our house is pretty cold, and I wanted another layer for her that wouldn’t impede her movement. The fleece doesn’t need hemming, even for the buttonholes, so it was a quick project.

vest

A basic pattern. Sew the sides and shoulders together, sew a button or two to the front, and snip buttonholes in the other side.

vest pattern

Two projects

We found a trove of old thread spools at a yard sale today. (Anyone who’s helped their granny clean out her house probably has a similar collection.) Much of the thread was old enough to be brittle and useless for sewing, but it looked pretty on the wooden spools.

I made a set of rainbow spools for stringing on a shoelace:

rainbow row

I brushed over the thread with watered-down Elmer’s glue to keep the ends from unraveling. For each spool, I made a match by unwinding some of the thread and re-winding it onto an empty spool.

sets of thread

When Lily’s older, we could mix the spools up for her to match. Or one set could be strung on a lace and she could string the other set in the same order. Or, more likely, she could lose several of them under the sofa and they won’t match any more, but I can dream.

I also made a group of spools from blues and greens that just look pretty together.

blue thread

I also finished a couple of board books I had been working on. I bought some board books at the thrift store, painted them white, and pasted in photos I got off the internet and had printed.

One book is about the Boston transit system, with pages for the different subway lines, bus, and commuter trains. If she’s anything like her father she is due to be obsessed with trains very soon.

mbta book

I also made a book about how our family celebrates Passover.

passover book

Making the books was kind of a pain, since the paint I used didn’t cover the book surface well and I had to do a lot of coats. By the end I was aiming for completion rather than perfection. It would be more expensive but easier to do the same with one of the websites that will print board books for you.

Project: book holder

I feel a little silly reading to a four-month-old, but I’ve started introducing Lily to books. Given the distinct lack of storage in the vicinity of our favorite chair, I wanted something to put a few books in. In Pinterest-land I would have some kind of wall-mounted display bookshelves made from recycled pallets, but I made this instead.

20140728_191322

The bottom and sides are made from a tube of fabric with cardboard rectangles inside:

20140728_182924

The back has a triangle that loops over and buttons over the chair arm. The front was too floppy so I sewed the edge over into a tube and stuck a chopstick in the tube.

It would have been better-looking with more lining and some interfacing to stiffen up the front and back, but this was faster. It took me about 30 minutes. I’m in favor of half-assing sewing projects if it means you will actually finish them.

You could also do this project with half a cereal box and some string.

Village

Last winter I was taking a bus home through Boston and thinking how different the buildings were from the ones I grew up with. I was thinking about what it will be like for my hypothetical children to grow up in a world of 1890s triple-deckers instead of 1980s colonials. And I started making these blocks.

IMG_20130704_164209_868

They are an assortment of real or mostly-real Boston-area buildings.  The church and post office are from Porter Square; the Goodwill and restaurants are from Davis Square.  Dragon Garden and The Burren are not really next to each other, but they are on the same block.

IMG_20130704_164302_152

This is Jeff’s family’s house, where we live now.

IMG_20130704_164319_387 IMG_20130704_164358_196

Teenaged passions

Teenagers have more skill than children and more time than adults, and they tend to get intensely into odd pursuits.  For my sister, it was learning the choreography from Newsies.  Jeff’s cousin is in a chain-mail stage and spends family gatherings clinking in a corner with pliers and a lot of metal rings. When I was 13 I spent a lot of time making Princess Leia costumes. (Laundry softener sheets were the only material I could find that suitably mimicked the fabric of her Cloud City over-robe. My mother was not pleased when she learned this is where all the softener sheets were going.) Jeff’s father can still play the guitar parts to Simon & Garfunkel songs he learned in the 70s – he hasn’t added to his repertoire since then, but the motor memory is still there.

I was kind of boggled to hear about the time and mental energy that Scott Alexander spent with his friends constructing societies in an imagined world. I think that might be the most intense, long-lasting, and awesome teenaged occupation I’ve ever heard of.

This all makes me wonder how teenagers could best use their intense interests. If you’re going to put a lot of hours into something, maybe it should be something that will help them later on. Maybe being able to play the run at the beginning of “The Boxer” is a skill you’re going to use more than your ability to recreate Leia’s awards ceremony hairstyle, especially after you turn 17 and realize that three feet of hair doesn’t look good on you. Getting into something like debate club or world-building probably helps you a lot later in life.

Of course, intense interests are hard to steer. I’m not sure that teenagers can really choose their passions. But it does seem worth mentioning to them.

Laced

Ever since the geek world went steampunk, I’ve been thinking about getting back into costuming.  I used to make the costumes for school plays and Renaissance fair type stuff.  And lately, I started craving an 1870s dress.  You know, back when dresses were really dresses.

But I’m too cheap to buy 10 yards of fabric and too busy to spend weeks perfecting a bustle, especially for a dress I would realistically only wear once a year at Boston’s science fiction and fantasy convention.  I decided to just make a corset instead.

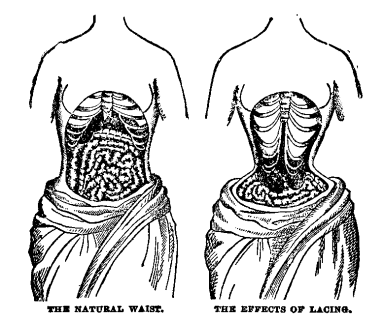
Part of me feels like a bad feminist for doing this.  Corsets were a major health and social issue of the 19th century.  Writers condemned “the folly and iniquity of tight-lacing.”  A doctor writing to the Lancet declared “The practice is a injurious to the health as its effects are monstrous to the eye.”  Freedom from corsets should be counted as a major win for womankind.

lacing

But I went ahead with it.

It had been a while since I worked on a serious sewing project.  I was reminded of how technically complicated it is to make 2-dimensional, non-stretch fabric mold to the female torso.  Years ago a boyfriend, trying to find an interest we had in common, asked me “Are there clothes engineers?”  We decided there were certainly engineers in the bra industry.  Corsets are, if anything, more engineered.

When you start looking for a corset pattern, you realize how many people there are on the internet who are deeply into corsets.  There are lots of fetishists, of course.  There are people who are still into waist training, or remolding your actual body through near-constant corset wearing.  (Most disturbing advice: “You may eventually get sores while wearing training corsets. . . . If you continue to wear training corsets with sores, you should make sure you put sterile dressing pads on them.”)

There are also serious hardware debates: “Common fabric store grommets I have found to be an abomination.”  “Light weight narrow plastic boning . . . perhaps if used in the hundred plus numbers still they might hold up, but in truth they’re a waste of petrochemicals.”  (If you’re wondering, spring steel is the favored material for stays.  Whalebone is sooo out.)

cutting

I used a yard of black velveteen I had bought at Dollar a Pound.  I was scared by the super-technical pattern drafting tutorials out there, so I used the duct tape method.  I used strips of plastic milk jug for the stays, which is not as stiff as I hoped for, but I was pleased to find my machine could sew it directly to the fabric.

The finished project has flaws.  It’s too big, so it doesn’t get as tight as I would like.  (Not that I’m interested in rearranging my ribs.)  But for five hours’ work and about $3 in materials, I’m pretty happy with it.

laces

Pockets

The pockets in women’s pants are inadequate. Since getting a larger phone, I’ve altered all my pants pockets to be able to hold it comfortably.

If you have moderate sewing ability, you should be able to do this.

First, turn the pants inside out and cut off the bottom of the pocket. Mind you don’t cut the fabric of the actual pants.

Image

Make a pocket extension, which is a little rectangular bag the same width as the hole at the bottom of your severed pocket. I want mine to be deep enough that my phone fits along my leg rather than my hip when I sit down. I made it out of fabric from a sheet – you want fabric that’s thin but not wearing out. Seam quality matters here if you don’t want to lose things – be sure your seam goes all the way to the edge and the stitches are close together.

 Image

Pin the pocket extension to the pocket. You want the cut edges facing out of the pocket.

Sewing the extension onto the pocket can get tricky. I machine sew the straight parts but hand-sew the corner if the edge of the pocket is sewn onto the pants. Be careful not to catch the pants in your seam.

The finished pocket:

Image

“Wendy,” he said, the sly one, “you could tuck us in at night.”

“Oo!”

“None of us has ever been tucked in at night.”

“Oo,” and her arms went out to him.

“And you could darn our clothes, and make pockets for us. None of us has any pockets.”

How could she resist.

– J. M. Barrie, Peter Pan